One of the top reasons freelance writers don’t start LinkedIn marketing is there’s so much advice out there. They either don’t know where to begin or get overwhelmed and give up.
We’re going to break through those obstacles right now. I’m breaking down what you need to do in this 30-day LinkedIn marketing challenge. No more flailing about, wondering if you’re “doing it right.”
Cut through the noise! Spend just 15 minutes a day following the steps laid out below and watch your LinkedIn presence soar.
Before you start:
- Set yourself up for success. Block out 15 minutes at the start of your workday to commit to this challenge.
- You don’t have to do it alone. Share it with a freelancer friend and keep each other accountable.
Let’s get started…
Day 1
Create a LinkedIn account
Simply go to LinkedIn and create a free or paid account. Learn about various LinkedIn subscription models here and choose a plan that best fits your requirements. Psst… a free LinkedIn account works well enough for now. You can always upgrade later when you bump against the limits on the free plan.
Day 2
Change your LinkedIn profile URL
For some reason, LinkedIn provides a random sequence of letters and numbers in your profile URL. Change it to your name/brand name. To do that: click on View Profile → Edit (pencil icon) next to Public Profile & URL on the right pane → pencil icon under Edit your custom URL → and add a custom URL. Save when done.
Write a headline
Include your profession, industry, and the types of writing you do. My headline reads: “Freelance B2B Tech Writer for AI, IoT, Blockchain, Web3, Cybersecurity, AIOps and DevOps | Interview-led Blog posts | White papers | Case studies | E-books | Forbes Thought Leadership |”.
Set a profile picture
Add your most recent headshot as your profile picture.
Day 3
Outline your About section or free-write the first draft
Today, write your About section. Remember, you’re only creating the first rough draft today. We’ll edit it later.
Frame three pain points/desires of your ideal clients as questions. Here’s mine:

Next, describe what you do and mention client names. Quantify your experience by mentioning how many clients you’ve worked with and for how many years.
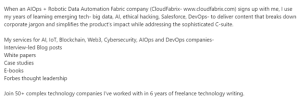
Highlight your ideal clients’ needs and how you meet them.

End with a clear call-to-action.

Day 4
Optimize your About section
Polish your About section. Give it a read and edit it for flow. Make sure you’ve added keywords, such as your niches and writing types. Call it done in 10!
Day 5
Add 10 skills
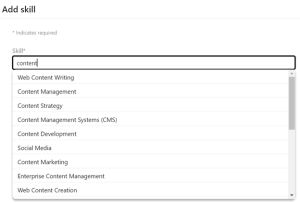
Time to showcase your incredible skills! Your Skills section must include the types of writing projects you do, such as white papers, blog writing, case studies, technical documentation, SaaS writing, etc. And any add-on skills you use in doing your job well, such as SEO, research, editing, interviews, etc. LinkedIn will recommend skills as you type into the search bar.
Add location, industry, etc.
Edit your profile to add your location, industry, email address, and so on. Also add your current experience, which could say Director at your registered LLC, “Self-employed” at your brand name, or Freelance Writer at your registered business.
Day 6
Set up the Featured section
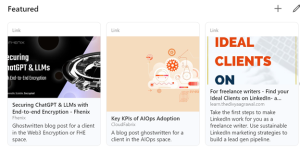
Your featured section can contain videos, PDFs, links to external pages, links to LinkedIn posts, etc. Design your Featured section to answer the question, “Why should I hire you?” for your ideal prospects.
Add three of your best writing samples, a lead magnet if you have one, and a link to your complete portfolio.
Day 7
Add a profile banner image
Elevate your profile with a stunning banner image that shows your brand and credibility. Use Canva to design your background image. Click on Create a Design and search LinkedIn. Click on LinkedIn Background Photo.

Add client logos for social proof, mention the types of content projects you take, and include your contact information.
(Optional) Read this piece about designing an impactful banner image.
You completed a week! Do a little dance. I promise I won’t look.
Day 8
Add Experiences
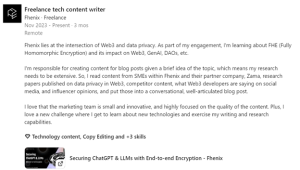
The Experience section has a lot of space to (a) appeal to your ideal clients, and (b) get some SEO advantage. Add three recent freelance clients to your Experience section. Fill only the required fields for now. Another day, we’ll add storytelling to your Experiences. Baby steps!
Day 9
Identify your content buckets
It’s easier to post content on LinkedIn when you have a clear idea of what you want to talk about. Pick a few areas you want to create content around. My content buckets include:
- How I offer specific services or my processes
- Client testimonials
- Client results
- My experiences and lessons from freelance writing
- How I find clients on LinkedIn
Day 10
Write your intro post and publish
It’s time to make your first post! Introduce yourself by telling your network what you do, who you help, clients you’ve worked with, hobbies you enjoy, and maybe a bit about your family life (show off your fur babies). Inject some personality into this post instead of making a formal announcement. If you tag me, I’ll be there to support you.
Additional read: Your First 5 LinkedIn Posts with Templates.
Day 11
Write your first comment
Join the conversation! When you leave comments, you not only share value but also build a conversation with the author of the post. So, scroll on your feed, find a post that resonates with you, and leave a comment.
Share your opinion, perspective, or experience, or ask a question to learn more about the author’s viewpoint. You can negate or support the opinions expressed in a post. Either way, be authentic and respectful.
Day 12
Write your next post and publish
You already have those content buckets! Simply choose a bucket and write your next post. For instance, if you have client testimonials, screenshot one, and publish it with context. You can talk about the project, the challenges you overcame while working on it, and how the experience helped you grow and learn.
(Optional) Read this article about building your content strategy on LinkedIn and implement it.
Day 13
Comment on five posts
We’re slowly ramping up efforts, but it’s no biggie. Simply scroll through your feed and find five interesting posts to engage with. Leave thoughtful, value-adding comments, or simply show your personality.
Day 14
Assess profile views, and search appearances
Time for a check-in! Look at who’s viewed your profile and how you’re appearing in searches. As you gradually become more active on LinkedIn, these metrics will improve.
For today, simply assess the quality and quantity of these metrics. Keep a log and see how these numbers evolve over time.

Day 15
Connect with profile viewers and commenters
Today, reach out to those who commented on your posts or checked your profile. Send them a personalized connection request with this note:
“Hi <name>, I noticed you viewed my profile/commented on one of my recent posts. <Add a short intro about what you do>. I’d love to connect with you here and keep in touch.”
Congratulations! You’ve conquered the first half of this challenge. This calls for a celebration… cake, pizza, an evening at your favorite cafe… you decide how you want to treat yourself for the stellar progress!
But hey, we aren’t done yet. Dive into Part 2 of this series (coming soon) for more LinkedIn marketing magic. We’ll keep it simple and actionable all the way through.